What Is Auxiliary Plane?
Important Point
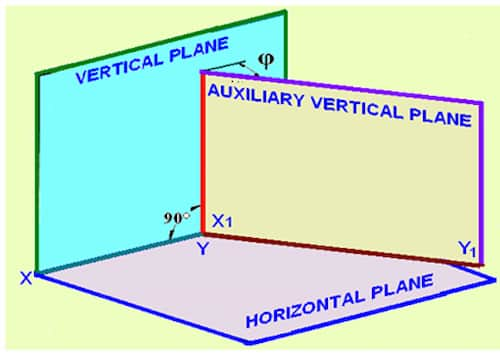
Auxiliary Plane The plane which we draw to get the true shape of the inclined surface ( often parallel to Principal Plane ) is an auxiliary plane.
Simply, the plane other than the Principal Plane ( i.e. Horizontal Plane, Vertical Plane or Perpendicular Plane) is called Auxiliary Plane.
Often one of the six principal views does not completely describe an object. This is justifiable when there are inclined or oblique planes or features on an object. For these special cases, a special orthographic view called an auxiliary view is required to be created.
Also, Read: First Angle Projection & Third Angle Projection Symbol (Orthographic Projection)
Types of Auxiliary Plane
Types of Auxiliary Plane there are two types. Which is as follows.
- Auxiliary Vertical Plane
- Auxiliary Inclined Plane
1. Auxiliary Vertical Plane
- The plane which is perpendicular to a horizontal plane and inclined to the vertical plane is called an auxiliary vertical plane. This plane gives auxiliary front view.
2. Auxiliary Inclined Plane
- The plane which is perpendicular to the vertical plane and inclined to the horizontal plane is called an auxiliary inclined plane. This plane gives auxiliary top view.
Definition of Auxiliary Views
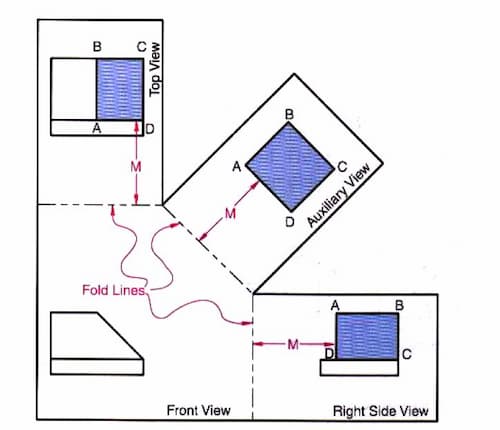
An auxiliary view is an orthographic view projected in such a way that the lines of sight aren’t parallel to the principal projection planes (Frontal, Horizontal, or Profile).
Simply, the view which is obtained on the auxiliary plane is an auxiliary view. There is an infinite range of potential auxiliary views of any given object.
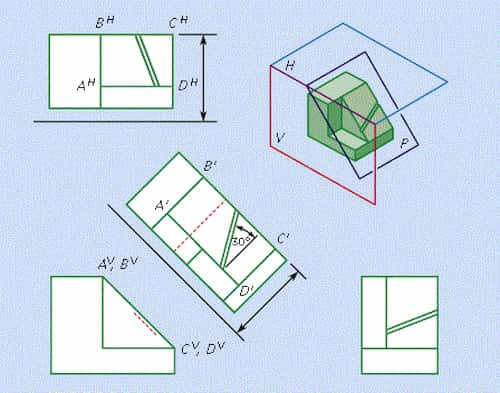
Auxiliary Views are often used to show the True Size of Inclined Surfaces as in generally inclined surfaces does not show their true size using standard orthographic drawing procedure.
Normally the auxiliary plane is parallel to the inclined surface.
Also, Read: Standard Room Size | How to Draw House Plan Step By Step
Method of Preparation of Auxiliary Views
Orthographic projections are prepared before making ready auxiliary views. The view within which inclined lines show actual length, perpendiculars are erected there with the inclined lines to get the particular length.
The breadth and alternative details are collected from the opposite view. Generally, the detail of the inclined surface is given within the auxiliary view. The opposite components within the principal plane are unheeded.
- Symmetrical Auxiliary View:
- Unsymmetrical Auxiliary View:
- Unilateral View:
- Bilateral View:
- Unilateral Auxiliary View:
- Bilateral Auxiliary View:
1. Symmetrical Auxiliary View
- If the auxiliary view lies uniformly on each side of the reference line, then it’s reffered to as Symmetrical Auxiliary Views.
2. Unsymmetrical Auxiliary View
- If the auxiliary view doesn’t lie uniformly on either side of the reference line, then it’s reffered to as Unsymmetrical Auxiliary Views.
There are two sorts of Unsymmetrical Auxiliary View:
2a. Unilateral View
- If the auxiliary read lies utterly on one facet of the reference line, then it’s known as Unilateral view.
2b. Bilateral View
- If the auxiliary read lies on one facet of the reference line asymmetrically, then it’s known as Bilateral view.
3. Unilateral Auxiliary View
- If it lies on one facet solely of the reference line, then it’s known as Unilateral Auxiliary Views.
4. Bilateral Auxiliary View
- If the auxiliary read doesn’t uniformly lie on each side of the reference line, then it’s known as Bilateral Auxiliary Views.
Types of Auxiliary View
Types of Auxiliary View there are three types. Which is as follows.
- Primary Auxiliary View.
- Secondary Auxiliary View.
- Tertiary Auxiliary View.
- Primary Auxiliary Views.
- Frontal Auxiliary View.
- High Auxiliary View.
- Profile/ Facet Auxiliary View.
- Secondary Auxiliary Views.
- Primary Auxiliary Views.
1. Primary Auxiliary View
- The single view usually projected from one among the 6 principal views. If this plane is perpendicular to any principal plane, then a shape on such a drawing is called Primary Auxiliary Views.
2. Secondary Auxiliary View
- The single view usually projected from another primary auxiliary view. If the auxiliary plane isn’t perpendicular to any principal plane, then the form shaped on such plane is named Secondary Auxiliary Views.
3. Tertiary Auxiliary View
The single view usually projected from a secondary/ tertiary auxiliary view.
Classification of Auxiliary View with respect to inclined lines is as follows:
- Primary Auxiliary Views.
- Frontal Auxiliary View.
- High Auxiliary View.
- Profile/ Facet Auxiliary View.
- Secondary Auxiliary Views.
3.a. Primary Auxiliary Views
- Auxiliary View that is ready in such a plane that is perpendicular to 1 principal plane and makes the inclined view with the opposite two principal planes is named Primary Auxiliary read.
- There are three sorts of Primary Auxiliary Views because of three principal planes as follows:
3.a.1. Frontal Auxiliary View
- The name of auxiliary views are given in line with the inclined lines within the principal plane.
- For example, if the inclined surface is seen within the frontal plane, then such an auxiliary view is known as Frontal Auxiliary View.
- Frontal Auxiliary view While drawing, it’s hooked up to the frontal plane.
3.a.2. High Auxiliary View
- If the inclined surface is seen within the high plane, then such an auxiliary view is known as High Auxiliary View.
- If the inclined surface is perpendicular to the highest plane, then such an auxiliary are known as high Auxiliary Views.
- While drawing, it’s hooked up to the highest plane.
3.a.3. Profile/ Facet Auxiliary View
- Similarly, if the inclined surface is seen within the profile plane, then such an auxiliary view is known as Profile/Facet Auxiliary View.
- If the inclined surface is perpendicular to the profile plane, then such an auxiliary are known as Profile Auxiliary Views.
- While drawing, it’s hooked up to the profile plane.
#3.b. Secondary Auxiliary Views:
- Auxiliary View that is ready in such a plane that isn’t perpendicular to any of the principal planes is named Secondary Auxiliary Views.
- Such a view is created once the inclined surface of the article is neither parallel nor perpendicular with any of the principal planes.
- Such an auxiliary is named Double Auxiliary read.
Also, Read: Principle of Plane Table Surveying Methods | Equipment | Error | Advantage | Limitation
How to Draw Auxiliary View?
To prepare an auxiliary view, the length and alternative detail regarding auxiliary views are obtained by taking projections from the inclined surface whereas, breadth and alternative detail are obtained from alternative views (like top view), for the completion of the auxiliary views.
Drawing Auxiliary Views
Once reading lines on the thing in an auxiliary view adjacent to a principal view, similar rules apply to reading lines in adjacent principal views.
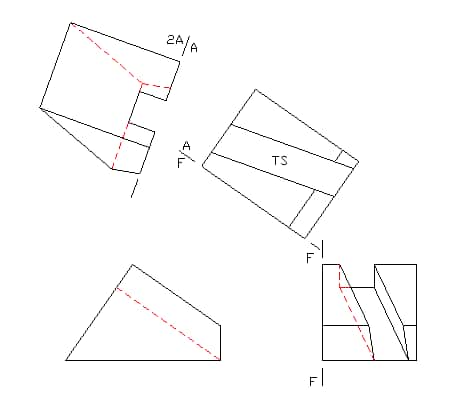
To utilize an auxiliary view to indicate a surface’s true size (TS), a view should be drawn wherever that surface seems as a line.
It’s impossible to indicate an oblique surface’s TS during a primary auxiliary view. Complete auxiliary views aren’t ordinarily drawn in business.
It is more common to ascertain partial auxiliary views that show solely the TS options. Since most of the opposite surfaces are going to be foreshortened, a whole auxiliary view becomes strenuous to scan.
- Depth auxiliary view: Generally projected from the front.
- Height auxiliary view: Generally projected from the top.
- Width auxiliary view: Generally projected from the profile.
There are two ways of viewing an auxiliary view:
- Complete Auxiliary View
- Partial Auxiliary View
1. Complete Auxiliary View
- This type of view allows the viewer to see the entire side of that drawing as projected from the auxiliary plane.
- With this projection, the other surfaces will appear fore-shortened which can make the drawing strenuous to read.
2. Partial Auxiliary View
- This type of projection allows the viewer to see only the part of that drawing that needs to be illustrated in its true undistorted surface.
- A partial auxiliary view saves precious time and produces a drawing that is much more readable. The full auxiliary view is strenuous to draw, read, and visualize.
Also, Read: What Is Dressing of Stone | Types of Dressing of Stone
Drawing Steps for Auxiliary View:
Step 1. Draw the given Orthographic View of the object.
Step 2. Draw the Auxiliary Plane(Take Centre Plane as Reference Plane).
Step 3. Apply the Centre Line Method and Copy the Distance from the Centre Line (Generally the Edge View is the Centre Line on the Top View).
Step 4. Draw the Projection Lines between the inclined surface and auxiliary plane.
Step 5. Complete the Final Auxiliary View by joining different points incorrect order.
Or,
Step 5. Examine the views that are supplied for an inclined surface.
Step 6 Locate the line which is considered as the edge view of the inclined plane.
Step 7. In the front view, draw light construction lines at right angles top the inclined surface. This is Line of Sight.
Step 8. Imagine the auxiliary plane as being attached by hinges to the front (vertical plane) from which it is developed.
Step 9. From all points labelled on the front view, draw projection lines at 90 Degree to the inclined surface (parallel to the line of sight).
Step 10. Construct a reference line collateral and equidistant to the edge view of the inclined surface.
Step 11. Transfer the Depth Dimension (In this case it is the Primary Reference to the Reference Line).
Step 12. Project the labelled points and join them in sequence to prepare the auxiliary view. The points used to identify the shape are for solving difficult problems on instructional purposes.
Why Are Auxiliary Views Used?
When making engineering drawings, it’s typically necessary to indicate options during a read wherever they seem true to size so they will be dimensioned.
The thing is generally positioned specified the most important surfaces and options are either parallel or perpendicular to the principal planes.
Views are commonly selected so most of the options are going to be visible within the 3 principal views. The front, top, and left or right facet views are most typically drawn.
Many objects are quite complicated, and therefore the three principal views might not best gift. During this case, one or additional auxiliary views generally are drawn.
Also, Read: What Are Planted Column, Floating Column, Hanging Column, and Stub Column
What Is Auxiliary View?
An auxiliary view is simply a “helper” view, which shows the slanted part of the object as it actually is. It turns, or projects, the. object so that the true size and shape of the surf ace (or surfaces) are seen as they actually are. Auxiliary views are commonly found on many types of industrial drawings.
Auxiliary View
An auxiliary view is simply a “helper” view, which shows the slanted part of the object as it actually is. It turns, or projects, the. object so that the true size and shape of the surf ace (or surfaces) are seen as they actually are. Auxiliary views are commonly found on many types of industrial drawings.
Method of Preparation of Auxiliary Views
Orthographic projections are prepared before preparing auxiliary views. The view in which inclined lines show actual length, perpendiculars are erected there with the inclined lines to obtain the actual length. The breadth and other details are collected from the other view.
Types of Auxiliary View
There are three basic types of auxiliary views. In the first type, the auxiliary view is projected from the front view of a three-view (orthographic) drawing. In the second and third types of drawings, the auxiliary views are projected from the top and side views.
How to Draw Auxiliary View
To sketch an auxiliary view, you begin with orthographic. views of the object and add projection lines perpendicular (90◦) to the slanted surface, adding a reference line any convenient distance from the view with the slanted surface.
Auxiliary Plane
Hence the additional planes are set up so as to be parallel to the edges and faces which should be shown in true sizes.
- These additional planes of projection which are set up to obtain the true sizes are called Auxiliary Planes.
- The views projected on these auxiliary planes are called Auxiliary Views.
Partial Auxiliary View
Partial Aux views Partial auxiliary view. In auxiliary views, it is normal practice not to project hidden features or other features that are not part of the inclined surface. When only the details for the inclined surface are projected and drawn in the auxiliary view, the view is called a partial auxiliary view.
Auxiliary View Definition
An auxiliary view is simply a “helper” view, which shows the slanted part of the object as it actually is. It turns, or projects, the. object so that the true size and shape of the surf ace (or surfaces) are seen as they actually are.
When Is an Auxiliary View Neede?
When an object has a slanted or inclined surface, it usually is not possible to show the inclined surface in an orthographic drawing without distortion. To present a more accurate description of any inclined surface, an additional view, known as an auxiliary view, is usually required.
Primary Auxiliary Viewd
A primary auxiliary view is projected onto a plane that is perpendicular to one of the principal planes of projection and is inclined to the other two. A secondary auxiliary view is projected from a primary auxiliary view onto a plane that is inclined to all three principal projection planes.
What Is the Purpose of an Auxiliary View?
Auxiliary views are a type of orthographic projection used to determine the true size and shape of inclined and oblique surfaces of objects. Normally, auxiliary views are projected from existing principal views. However, auxiliary views can also be drawn first and then used to create a principal view.
Profile Plane Definition
A third plane perpendicular to both coordinate planes, and hence to the ground line, is called a profile plane. This plane is vertical in position, and may be used as a plane of projection. Projections of a Line on Horizontal, Vertical, and Profile Planes.
Like this post? Share it with your friends!
Suggested Read –
- Different Types of Washers | When to Use Washers | How to Use a Washers | Shapes of Washers
- What Is Survey Levelling | Important Terms Related to Levelling | What Are Different Types of Levelling | Types of Trigonometric levelling
- Emulsion Paint Vs Oil Based Paint | Purpose of Providing Paints | Properties of Good Paint | Properties of Good Paint | What Is Oil Based Paint
- Building Layout | How to Building Layout | What Is Method of Layout of Building | Control Lines of Construction | Construction Layout
- Definition of Shear Force and Bending Moment | What Is Shear Force | What Is Bending Moment | Relation Between Loading, Shear Force & Bending Moment
- What Is Road Pattern | Different Types of Road Patterns | Grid Pattern Definition | Radial Pattern | Rectangular or Block Pattern | Minimum Travel Pattern
Originally posted 2022-04-08 01:10:06.


Leave a Reply